
Create an Order Form
If you’re running a business like a restaurant or a physical store, you might not want to create a whole online shop. However, you may want to offer an easy way for customers to order food or other goods for you to deliver. The format of the order form may vary from one business to another; however, certain fields are constant like list of products and/or services that are to be delivered, the billing and shipping address.
In this tutorial, we’re going to show you how to create an order form in EFFORTx platform. This will allow you to easily collect customer orders without adding a full-fledged eCommerce software to your website. The below are the steps involved for creating a sample order form.
Step 1. Plan Data Collection
An order form is an essential business tool that enables companies to record the purchases that their customers make. Regardless of what kind of products or services you sell, you'll require some version of a sales order form. Before you create one for your business, it’s best to think about what you want this document to achieve. Create an order form that includes all of the information you require and automate the process to increase efficiency for your business.
-
Order forms can have different formats. However, some fields are almost
always included:
Product or service information: Note what items are being purchased. Provide descriptive details if necessary. Include a column for the quantity of each item.Price: List how much each item costs.GST, delivery charges and shipping charges: Tally up the purchases and calculate any additional expenses as needed.Total price: Add up the purchases and the additional charges to ascertain the total price.Customer name and contact information: These details are critical for tracking who the sale has been made to.Customer shipping information: The shipping details are required for delivering the products or services.
-
In the screenshot below, you can see the completed sample order form with a
dropdown list to select the product, personal details, and shipping
details.

Step 2. Create the Products List
Next, follow the steps below to create a list with the products and prices.
- Go to .
-
Create a list with the title Products as shown below.

-
Add the below items to the list along with the price.

Product Price TR101 Terrabit Router 49000 BF101 Blaze Firewall 69000 TS101 Terrabit Switch 39000 The above are the sample products created for this tutorial. You can create your own products. For more information, refer to
Step 3. Creating an Online Order Form
In Create Form, we will divide the form into three pages: Order Details, Personal Details and Shipping Details. The Personal Details and Shipping Details will contain fields with no special functions, whatsoever. The Shipping Details page is where we will add fields and set them as computed. It takes a bit of time, but we repeat again, it’s not that hard.
- Simply head over to to create a form.
-
Now you'll see a Create Form page with Title field, Field Types,
Publishing options, and Properties sections. Enter title as Order
Form in the Title field located in the top left corner.

-
Move your cursor towards Fields section, and click the
 icon to
create additional pages.
icon to
create additional pages.
-
Click the page, and enter the title in the Page Title field under
the Properties section. Do the same for all the pages.

-
After you enter a title, drag and drop the data types Pick List,
Currency, Number, Number, and Currency to the Order Details
page and give the labels as shown below.

If you want customers to be able to select two or more products, you’ll need to use a Repeatable Section field. In this example, you can order only one product. -
Now configure the Products list to the Pick List field which
is labelled as Select Product.

-
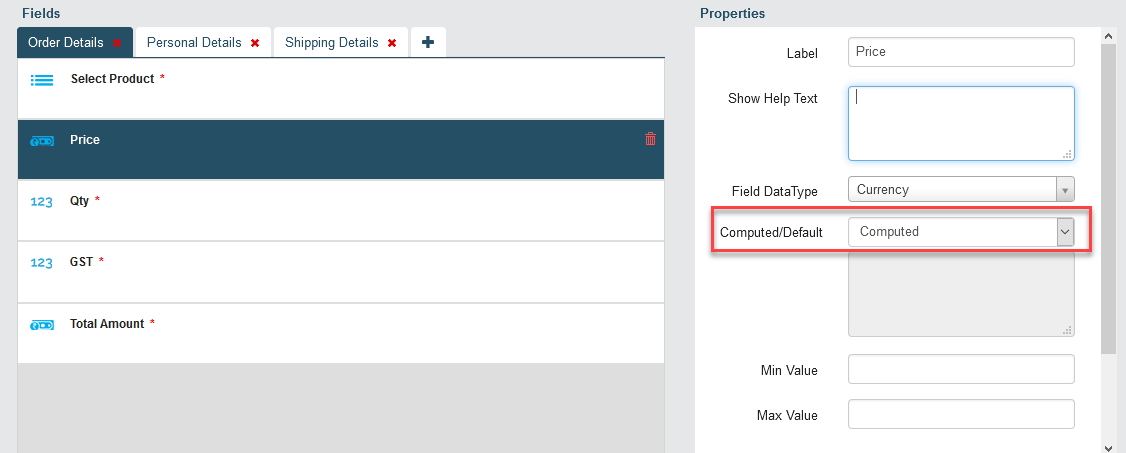
On selecting a product from the list, the price must be displayed
automatically. To configure price, click the Price field and make it
as Computed.
-
Now click the grey box under the Computed field to give the
formula.

In the above example, the price is displayed from the Products list. -
Similarly, for the GST field, the GST value must be generated based on the
product price. To configure the GST value from the product price, make the
GST field as a Computed field and give the appropriate formula as shown
below.

In the above example, 18% of GST is added to the product price. On selecting a product, this field will generate the GST value of the price. -
In the same way, the Total Amount field should be the sum of the
product price and GST. Make this field as Computed, and give the
formula as shown in the image.

- We have done with the design of Order Details page. Click on the Personal Details page to add fields.
-
Now drag and drop the data types Text, Text, Phone, Email and
Calender to the Personal Details page and give labels to each
field as shown below.

- Simply click on the field and then uncheck the ‘Required Field’ box on the right to make the field as optional. You can follow this process for any field that you want to be optional. You can tell which fields are required because they’ll have a red * sign next to the field’s label.
-
Now click on the Shipping Details page, drag and drop five
Text and one Number data types to it, and give labels to
each field as shown below.

Refer step 12 to configure the optional fields.
Step 4. Publish the Form
-
Click on Published button.

The published forms are available to employees only. In this case, the employee must visit the customer, and need to take the order. -
Click on Make Form Public button.
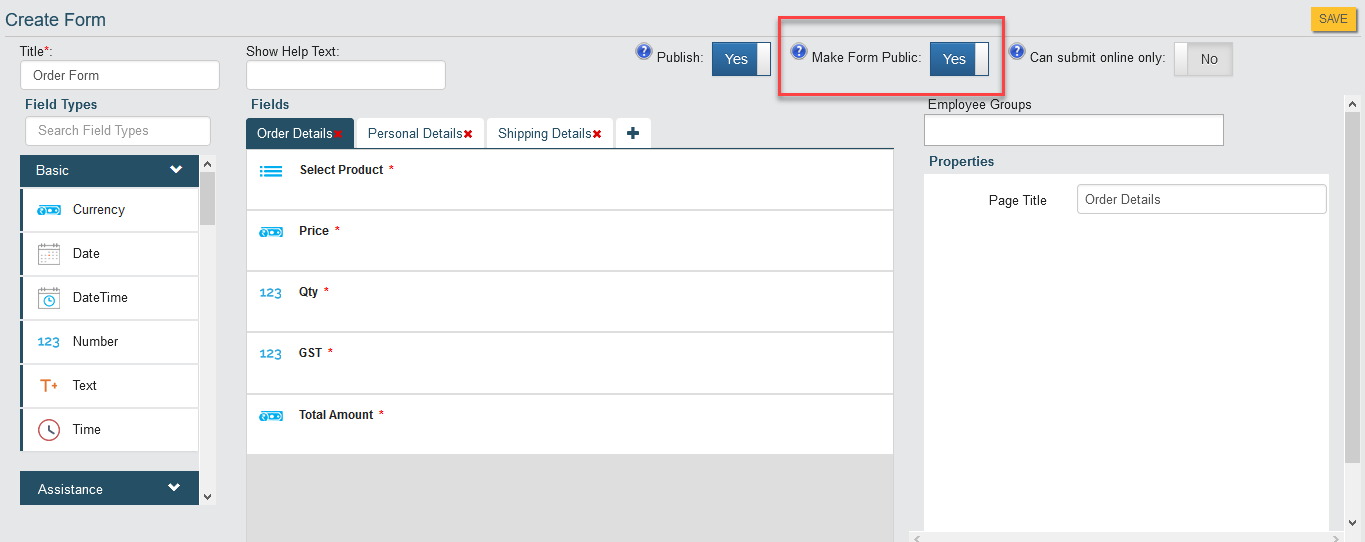
If you choose Make Form Public, it will generate a shareable link. -
Go to the Form Actions page, click on Get Shareble Link card to copy
the link. You can post this link on WhatsApp groups, and social media
platforms to take the orders.

Step 5. Fill the Form
This section gives information about taking orders through the mobile app.
- Open EFFORT Plus app on your device and go to the Forms page.
-
Select the Order Form by tapping plus
 icon
icon
-
The Order Form opens with 3 tabs such as Order Details, Personal
Details, and Shipping Details along with navigation controls.

- Collect the mandatory details and submit the form for further processing.
Step 6. View Form Submissions
This section gives you information about form submissions. You can view the details filled in the form by following the below steps.
- Go to to view the form submissions.
-
Click on Order Form card to view the number of form submissions and
the details filled in the form.

-
Click on ID to view the details filled in the form.

You can find the form submission details as shown below.
- To get all the form submissions as report, refer to Generate a Form Submission Report.